Tuesday, January 31, 2012

cropping with mom


this is my mom. isn't she lovely? i agree =D

we had a crop at my local michael's store, and look at all the goodies she made! i consider myself so, so, so fortunate to be able to spend time with my mother. my other siblings all live at least 8 hours away (one across the country!!) and don't get a lot of time with my parents. how blessed i am that God shook his head at me asking to move away as an adult.

my mom did a lot of techniques on these cards:

fussy cut
paper distressing
paper tearing
ink distressing
rubber stamping

she used:

ribbon
punches
rhinestones
brads
buttons
and forced me to learn the cricut (boy do i feel dumb! it was simple!!)

she made a hanging piece of wall art for my grandmother (on the right) and a mini album out of paper lunch sacks (on the left).

thanks so much for crafting with me, mom! seriously, the only thing better than family is crafting with family

Monday, January 30, 2012

paper flower how-to

i will be teaching a new class at Michael's starting next month titled "flowers WOW!". these are the wonderful creations we will come up with! just because you're you, and i love you, i'm gonna share my how-to with these. super simple!!

for these flowers, i started with a 6x6 square of cardstock. i rounded the corners (doesn't have to be perfect) and then, using regular scissors, cut into paper like a circle, but creating a spiral shape, trying to leave about 2cm in between cuts. when you get to the center of the paper, leave about the size of a nickel un-cut. starting with the outside, roll the paper around a pencil until you get to the "nickel" piece. here you can keep the flower tight or let it loose if you'd like, i let mine go just a bit.
i used hot glue gun on the "nickel" piece and pressed my flower into in lightly.

here's where the variations come in. you can use decorative scissors to cut the spiral, changing the look of your "petals"; ink &/or stamp the paper before you roll it. you can also spray glitter or shimmer mist onto finished flower, or mist lightly with water and smash with your palm. lots of cool things to do with these!!

Wednesday, January 25, 2012

birthday card

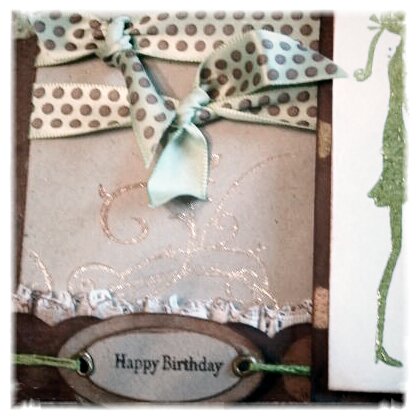
i used a piece of brown paper bag on this, wanna play "i spy"?

this turned out super cute, it's definatly on my "like" list. honestly, it's amazing how many projects i finish and end up not liking the results. this here, not one of 'em! lots going on, but there's no such this as too much.

baby & i have both been sick for the last couple of days, it was nice to get my fingers dirty. i love how i can jump into my hobby whenever i want. having a craft area in the house is so convenient. i'm so fortunate to be able to have a hobby. before i came across paper crafting, i was the person my family had wrapping all the gifts at Christmastime. that was pretty much the extent of my craftiness. i love it when God makes me blossom!

card is 5x5

i stamped a flourish then went over it in a glitter pen.

girl is heat embossed in a clear gloss.

i inked the lace before bunching it up behind the patterned paper.

to cut the scallops, i took the guide off my slit punch and made it into a border punch.


dimesionals, layers, and inky edges, OH MY!!

new inspiration

talk about a TON of pretty in one spot! i was on split coast stampers just looking around and came across a company i hadn't heard of before.
whiff of joy

AMAZING!!
it's vintage, inky, shabby, cute, and some extreme texture! LOVE it!!

Sunday, January 22, 2012

tiny dancer


so my little girl is no longer tiny, but she will always be my tiny dancer.

it's odd the way things work out. my oldest daughter is a mini-me, in almost every way. it's seriously so obnoxious! i feel so sorry for what i put my mother through... i'm mostly kidding here. it can be horrible, but i am reaping what i have sowed and God has an amazing plan for my little leader. i got off topic. what i meant to tell you about was her dancing. this girl has some serious moves! ever since she could walk, she could keep a beat. she loves to sing, anything drama related, and when there's music, she can't sit still!

my other daughter is a diffrent story. first off, she's the spitting image of MY little sister. kinda freaky, in fact, maybe i'll post pictures of them at some point just so i can become the told-you-so fairy. well she (like my sister) has no rythem. she tries, oh how she tries, alas the girl can't even clap to a song in time. but more than anything, she is a princess and has always said she wants to be a dancer. we got her into dance classes, she had a blast.... for the first couple of months. she hated it and came to despise going on a weekly basis. needless to say it didn't work out.

no matter the outcome, my little girl will always be my tiny dancer.

this card turned out beautiful, totally more my style. INKY!! i got a new cartridge for my slice and was just dying to try it out, this is the outcome. comment me if you have questions, enjoy your week!

just in case she happens to pop in and read this, my sister needs to know that i'm not in any way trying to offend, i love her so very much. God knew exactly what i would need in a friend when he decided to one-up it and give me you as a sister. love you!!

Thursday, January 19, 2012

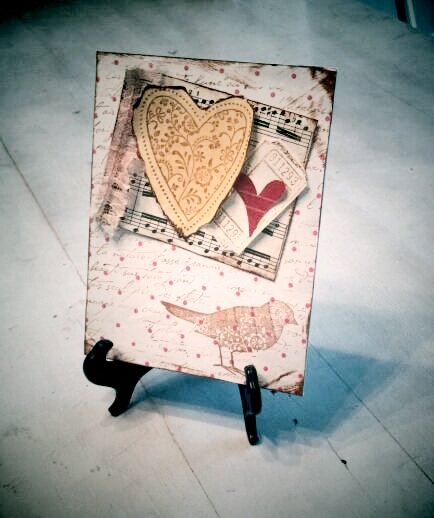
shabby valentine


the valentine card i made last was cute, but so clean!! i just couldn't deal with it, so i had to make a shabby one! it's just not "jenn" if it's not ink distressed :)

many layers to this card, most of which i used tim holtz walnut stain on. the patterned bird and heart are from a SU (stampin' up!) set, so is the script that is stamped onto the patterened paper. the ticket stamp is a new one. well, not new, i've had it for about a year and half and never taken it out of it's package. it's from invoke arts and they have some great stuff! check them out here.

clean & simple


it's about that time of year again to think of love. when i think of lovey cards, i always go back to black, white & red. i just adore that color combination, so classy!

i made this for a Valentines party invitation for Sharon Care Center. and this has to be one of the most simple cards, only 2 pieces of paper, 2 stamps, 2 ribbons (well, one lace, one ribbon) and some stickles. clean & simple! ---which it usually not my style at all, so i'm amazed that it turned out cute AND i actually like it!!

Tuesday, January 17, 2012

my God, is an awesome God!!


this was the view i got the privelage of waking up to this morning. it's gorgeous! just simply breath-taking. i am in total awe of God's workmanship, he is seriously AMAZING!

i have been doing a study on the book of James and am swimming in 1:5&6. "..you should ask God, who gives generously to all without finding fault, and it will be given to you. but when you ask, you must believe and not doubt..." after looking outside, how can anyone doubt? my God, is an awesome God!

well, the power is back on so i'm gonna head to the craft room to bust out some valentines cards! enjoy your january!

Christmas wreathes


i made two wreathes this year. the red & white one was made for my mother in law. the blue and silver one was for us (hubby loves the look of those two colors at Christmas time!)

i got all supplies from the $ store and michaels AFTER Christmas last year when every holiday item was up to 80% off. i went back a couple of weeks ago to stock up on holiday items for next Christmas. can't beat clearance!

Saturday, January 14, 2012

cupcake for a teenager


my baby turns 13 tomorrow!

when she returns from winter camp, there's a family potluck at church. instead of bringing a dish to share, i'm taking almost 100 cupcakes!

Tuesday, January 10, 2012

altered journal


my daughter is turning 13 this weekend. 13!!
thirteen. *sigh*
i will be the mother of a teenager and a 7 month old, all at the same time. talk about mid-life crisis!

i made this altered journal for her to take with her to winter camp. the good kid she is *cough* (this time, for now, but no really, she's a good kid, sometimes), all she wanted for her birthday was to go to winter camp with our church youth group. i am seriously so proud of that decision! i don't even think there's a boy involved (other than Jesus, of course)!

took apart a spiral bound notebook and covered the front and back with scrapbook paper using mod podge and hot glue. used my crop-o-dile on the edges before putting it back together. if this were for me, it would have beed completely distressed, however, that's just not her. so she picked out her ribbons and flowers and away we went!

prayers for her to not only have an absolute blast, but return home with the beginning of an itimate relationship with her heavely father.

Monday, December 26, 2011

homemade coasters


i tried my hand at homemade coasters this holiday season as a gift to my sisters. i started with a chipboard base and covered it with paper (scrapbook paper and sheet music) using mod podge. i then stamped sayings on 4 of them and stenciled a mustache on the other 4. i covered them again, in mod podge. i actuallt tried using a glossy spray finish, but didn't like the look so did it again in the podge.

i am the luckiest girl in the world to have such amazing sisters. i love you ladies!!

secret books


this year was a "homemade" Christmas. i had a secret book as a child, and remember fondly stuffing my treasures into the hollow space, and hiding it on a shelf to trick my sister who would, without a doupt scour my room in search of them.

i found some older hardback readers digests at a local thrift store. after covering the outside of the pages with mod podge and letting it dry, i used a craft knife to hollow it out. once hollow, i covered the inside with mod podge also.

hope the boys in the family enjoy keeping their treasures hidden from their younger siblings!

handmade childs quilt


this picture just does not do it justice!

i was working on this while the girls were in school (it was for my daughter) but didn't get it finished by the time winter vacation started, so i just kept working on it. my daughter came up to me and asked who it was for. after telling her that it was for her cousin, she begged me to make her one just like it. she said she had to have it! so i got it all finished and wrapped, under the tree (with an incorrect name on it) it went.

Christmas morning arrived and she went straight for the quilt, still wrapped and under the tree, tagged incorrectly. she picks it up and looks at me, "mommy, i know this isn't for cousin because we already gave her gifts to her. i was hoping it was for me. thanks mom, i love it!" and proceeded to tear into it.

at least i know my hard work was appreciated and she did in fact like her gift.

handmade quilt


over 10 yards of fabric in this queen sized "WSU" quilt that i made for my brother-in-law. boy did this thing give me some trouble!! it was all worth it though, hope you enjoy it scott!

Thursday, December 15, 2011

my new website

it is still a work in progress, but since i have it listed in the side bar, i should probably share it with you :)
i now have a website to share my ideas on inexpensive home decor items, cheap meal ideas for your family, couponing tips, and of course, a place to sell my handmade goodies. please visit intricate simplicities.
keep in mind, i'm working on it a little bit every day, and with all the Christmas projects i'm working on, i'm not expecting the site to be fully up until after the holidays.
i will continue to post my craftiness here, and most of it can be purchased on the site.

merry Christmas! remember the true reason for the season!!

Wednesday, November 30, 2011

i mustache you a question


i am making some Christmas gifts for my family and came across this wonderful mustache template. my sister is just crazy, CRAZY i tell you, about mustaches.

i got this template from tiffanykelley she makes some pretty cool photo props out of them, pop on over and take a peek!

my project is not complete, so i'm not going to tell you about it, just wanted to share the mustaches. janell, enjoy!!

Saturday, November 26, 2011

accidental favorites

my parents came over for dinner and it was like having an in-home babysitter!! my kids were still here, i still got to watch them play, but i got to bake and cook and actually get stuff done!

i've wanted to try this recipe for awhile now. i got it out of a rachael ray "everyday" magazine (courtesy of my mother, thanks mom!). my husband loves apple pie and the apple fritters looked like a little bite of pie (and a portion of the mess!). well, hubby didn't like them exactly as they came out, my first batch had powdered sugar on them. i guess he doesn't like powdered sugar. something about some movie ("children upstairs" or something like that), i guess the old lady gave them cookies with powder on them and they died. i don't know, i don't watch scary movies. it explains a lot though. he has always shuddered at my powdered donuts or french toast covered in white. oh well, more for me!

anyways, he wanted cinnamon sugar on his which got me thinking of elephant ears and funnel cakes. so once i ran out of apples, i filled a small ziplock sandwhich bag with the rest of the batter and squirted it into the pot of oil. cover that bad boy with powdered sugar (non for you, hun!) and viola!! just like the fair! i've been looking for a good funnel cake recipe for, i don't know, EVER?!


recipe:
Vegetable oil (for frying)
1 cup flour
2 tablespoons granulated sugar
1/4 teaspoon salt
1/2 cup apple juice (or cider)
1 large egg, plus 2 large egg whites
3 apples (i used 6 & had extra batter) peeled, cored & sliced into rings
powdered sugar & cinnamon sugar for dusting

1: fill large pot with enough oil to reach depth of 2" and set to medium. in a large bowl, whisk together the flour, sugar, and salt. add 1/4 cup juice and the whole egg. stir to form a smooth paste. stir in the remaining juice and let stand until thickened (about 5 minutes). in a bowl, beat the egg whites until stiff then fold into the batter.
2: working in batches, dip apple rings in the batter and fry until golden, about 3 minutes. turn to brown both sides. transfer to paper towels to drain and dust with desired sugar. serve warm.

if you like the fair, and have a hankering for funnel cake, skip the apples and put the batter into a decorating (for cakes) bag or snip the end off a ziplock and fill with batter. ENJOY!!

Wednesday, November 23, 2011

Tuesday, November 22, 2011

Monday, November 21, 2011

Sunday, November 20, 2011

Monday, November 14, 2011

tea bag holders


so i did mine a bit diffrent than the tutorial, mainly to save paper. paper=$ afterall :)

found a great 36pc stack of holiday paper at Michael's for $12.99. i used my 50% off joannes coupon to make it $6.50. i think that was a great price since all the 48pc stacks were "on sale" for $11.99 and not eligible for coupons.

the thing i learned with this project: bone folders can be extremely handy!

Saturday, November 5, 2011

Halloween cupcakes


Sent from my U.S. Cellular® Android-powered device

great tutorial

there's a great tutorial that i came across at splitcoast stampers for making tea bag holders. we're doing a holiday dinner at our church for the ladies and i plan on making these as take away treats. check out the tutorial here and i'll post pics of mine when i get them made.

Monday, September 26, 2011

feminine & fancy


YEAH!! i love how this turned out. so shabby, so chic.

This card promotes a card class that i'm currently teaching at our local Michael's store. Lots of diffrent techniques with this class and what great supplies we use!

Tim Holtz card


once again, this was made to demo what the ink distressing Tim Holtz class is all about. Love the shabby look! i walked away from this with inky fingertips, my favorite!

Tim Holtz style Halloween

It's about that time of year again! I made these samples for the Tim Holtz ink distressing class that i'm currently offering at my local Michael's store.


these were lots of fun, but then again, i LOVE to get down and inky!!

re-vamping a rocker

BEFORE (although i forgot to take the "before" shot before i had spray painted) meets AFTER:

i am just in love with how it came out! this fabric is phenominal (thanks wal*mart for finally carrying beautiful and current appolstry fabric!!) and it matches our decor. I did my dining set (you'll see that soon) in it along with a window valance for the kitchen.

We actually had a large garage sale once we decided to move, and tried to sell all of our furniture. i was so sick of looking at it, i came to the conclusion that it had to go! well, it didn't sell. none of it. so i got to spray painting! i sprayed it a glossy white then did a clear overcoat. my aunt (thanks aunt z!) has been helping me learn to sew now that i have a machine, so i decided to take apart the padding on the current chair and re-use it with better fabric. YEAH!! i'm so proud i didn't mess it up, well, that you can see in the photo anyways. "just flip it over!", that's what i say!

PS: i'm aware that i spelled appolstry wrong. wish i could find the spell check...

Wednesday, July 6, 2011

Just because

well, not just because. my sister came to visit (both of my sisters, actually) a couple of weeks ago. they were joined by a large part of my family. a mini-reunion, if you will. they were all in town to celebrate birthdays, anniversaries, and a local once-per-year festival.

is your family like mine? the most valuable thing to us is our time. sooo, we grouped my mothers 60th, my sisters 33rd, my other sisters 30th, my brothers 28th, and my parents 20th anniversary all into one afternoon. it was the same weekend as "cheese days" (friday-sunday annual gathering of locals in our small town celebrating our towns heritage involving manufacturing of cheese. describing the joy of cheese days would take far too long. maybe another time...).
anyways, this card was done for my sisters 30th birthday. i hope she loved it and had a fantastic birthday. love you sis!


Sent from Yahoo! Mail on Android

Thursday, June 30, 2011

Grown up birthday card

this was done for my mothers birthday. it's rich, elegant, sophisticated, and appears complex. just like her.

i love this nature set by SU. i used blender pens w/ chalk to color it for that perfect "soft" look. colors are feminine and warm. any chance i get to use my embossing folders with my cuttlebug, i jump on. LOVE the look!

happy birthday mom! here's to many, many more!


Sent from Yahoo! Mail on Android

Monday, June 20, 2011

Sunday, June 19, 2011

Fairy birthday card


this card was made for the sweetest little girly on her birthday. she is an absolute princess, BUT, this little fairy stamp is the closest i have to a princess. after i colored her with blender pens & chalk, i used sakura glitter pens & stickles to make it sparkle, just like her personality does.

happy birthday, charley!

Sent from Yahoo! Mail on Android

Saturday, June 18, 2011

Fathers day card


EMPTY YOUR SCRAP PILE!!

super easy cards. i got the idea from a card i saw made by layering ribbons. i decided to use paper instead. i dug through my scrap drawer & pulled out the colors i liked together and cut one edge with a scallop border punch. ink distressed them all and there we have it!

Sent from Yahoo! Mail on Android

Friday, June 17, 2011

Fathers day card


this was made for my fantastic mr. he is the kind of guy who loves to get dressed up and collects ties. he is also the kind of guy who adopts his wife's kids from a previous marriage to make sure they have the best father figure around & that they always know that he considers them "his" kids. the kind of guy women dream of meeting. yep, he's a pretty fantastic guy. know what else he is? MINE.

i made my own patterned paper (background) by stamping ties in a pattern on white cardstock. these stamps are 2-step stamps. that means the outline is one image & the fill in is the other. for the main image of the tie, i stamped just the outline onto patterned paper & cut it out. the rest of it is layered & ink distressed.

to all the fathers out there, happy day to you!

Sent from Yahoo! Mail on Android

Tuesday, June 14, 2011

Be original card


so this was me trying to be creative. honestly, i'm not too keen on the outcome.

started with white cardstock. stamped the fish in walnut ink and the original fish in a yellow. then i got out my sponges & chalk ink to play for a bit. started sponging at the bottom of the paper with the darkest blue,worked up to mid blue, finished up top with lighter blue.

Sent from Yahoo! Mail on Android