This is my first attempt at handmade clothing. I actually got a pattern and fabric LAST SUMMER to make both my daughters dresses. Yeah... I got home, opened up with pattern, sat there for a bit, then put the pattern back into it's little envelope. They have been hibernating in a drawer ever since!
This is like an actual dress! There's a bodice piece, a mid section, and I even learned how to "gather"!
My aunt came up from Portland to help me learn how to use patterns, boy did I need her! In one day, we completed this dandy thing! I think it's adorable! The best part is the fact that she taught me how to make it fit her now and yet keep it secretly big enough for her to grow into!
Thanks aunty!
--oh, she was so excited that she wore it to school today! It's cold here, but she put on a pair of jeans and a white tee-shirt, and that dress got to be the top layer! -------------> Proud mama right here!
Thursday, April 19, 2012
Friday, April 13, 2012
Altered Journal
I head to ladies retreat this afternoon!! I was packing for it and realized that I didn't have a cute journal/notebook to take, so I decided to make one! This was just a $1 spiral bound journal that I got out of the dollar bin at my local Michael's store.
I even put a little pocket in the back to keep some of my Stampin' Up! buisness cards in. Just in case I see some crafty ladies :)
Thursday, April 12, 2012
One Sheet Wonder
WOOHOO! I am headed to ladies retreat with my church this weekend, and to get ready for an amazing weekend, my friend Katie and I made some cards to take. You know, anticipating making new friends who should receive them :)
We started with an 8.5x11 peice of white cardstock and began stamping the flowers EVERYWHERE!! We cut up the cardstock (I have a template for this, but will share it later) to make 10 different cards all using the marvelous background paper that we had created from the flower stamps.
These are the stamps that we used:
Awash With Flowers - Clear-Mount Stamp Set, item #120549 Price: $27.95. Click HERE to see it in the catalog
Four Frames - Clear-Mount Stamp Set, item #123442 Price: $15.95
Click HERE to see it in the catalog
We started with an 8.5x11 peice of white cardstock and began stamping the flowers EVERYWHERE!! We cut up the cardstock (I have a template for this, but will share it later) to make 10 different cards all using the marvelous background paper that we had created from the flower stamps.
These are the stamps that we used:
Awash With Flowers - Clear-Mount Stamp Set, item #120549 Price: $27.95. Click HERE to see it in the catalog
Four Frames - Clear-Mount Stamp Set, item #123442 Price: $15.95
Click HERE to see it in the catalog
Current SU Promotions
Free ink pad with every $30 purchase now until 5/5/12. You must order through me to take advantage of this offer, get ahold of me!
Book a workshop now through June and get a free pack of Designer Series Paper! Ask me how!
Neck Warmer
I have seen similar things on pinterest-
--Have you heard of it? It's like an online corkboard for all your personal favorite things! Are you on pinterest? It's completely addicting! I LOVE it!! You can see my boards here--
ANYWHO-- I had seen something similar and I have a thing for scarves. Throw in some amazing buttons and you've got yourself a fan right here! I made this while at the retirement home to sell in the craft fair they will be having later this month (all proceeds go towards outings for the residents). It is a simple crochet with fabulous velvet yarn and three great wooden buttons. Basically it's a really short scarf that you attach at the neck, nothing to hang down and get caught in the car door :)
--Have you heard of it? It's like an online corkboard for all your personal favorite things! Are you on pinterest? It's completely addicting! I LOVE it!! You can see my boards here--
ANYWHO-- I had seen something similar and I have a thing for scarves. Throw in some amazing buttons and you've got yourself a fan right here! I made this while at the retirement home to sell in the craft fair they will be having later this month (all proceeds go towards outings for the residents). It is a simple crochet with fabulous velvet yarn and three great wooden buttons. Basically it's a really short scarf that you attach at the neck, nothing to hang down and get caught in the car door :)
Friday, March 23, 2012
new inspiration!
I have a Stampin' Up! workshop tomorrow and have been doing some research on diffrent techniques and products that I'd like to showcase. In doing so, I came across Bronwyn.
WOWZERS!!
If you haven't seen/heard of her before, you need to go check her out! Her blog is A. MAZE. ING. :
addINKtive designs
WOWZERS!!
If you haven't seen/heard of her before, you need to go check her out! Her blog is A. MAZE. ING. :
addINKtive designs
Saturday, March 10, 2012
altered canvas
This is a new class that I am offering at my local Michael's store. The student can start with any size or style of canvas that they would like, i used 8x8 plain white, with a bit fatter of side pieces.
These are two of my finished canvases (Is that a word? Is it spelled correctly? Is the plural of "canvas" like the plural of octopus? Is it canvi?) alongside what I started with.
I'm not really a pinky kinda girl, but I think I actually like the pinky one the best.
This one has great colors, love the vintage look that it's got going on.
Almost all of this is just patterned paper that I fussy cut a design out of.
I also used lots of diffrent punches, and of course, ink distressed EVERYTHING!! It seriously felt so good to walk away from a project with my hands just filthy. LOVE it!!
This is my new friend, Cheryl. Come to find out, after spending all afternoon together in this class, she knows my father from about 15 years ago! Such a small world!
Cheryl is new to the world of paper crafting, and you wouldn't be able to tell it from her finished products.
She brought the neatest things to incorporate into her projects. Seed packets, an old flower guide, and vintage sheet music. If you ask me, she's on her way!
Friday, March 9, 2012
birdy birthday
Happy birthday to my mother-in-law!
The patterned paper that is used is the in color '13 designer series paper, you can see and order it HERE
I paired it with certainly celery cardstock and a touch of ribbon.
What do you think of my doodles? I never do doodles. Between that and the lack of ink distressing that's been going on (or NOT going on), I think I'm turning a new leaf in this crafty life I lead.
This set is called "aviary"
You can see and order the set HERE
This was one of the first sets in the current catalog that I just had to have. So glad I got it, it's so versatile!
Thursday, March 8, 2012
outta this world!
My brother in law has been giving me such a hard time about some lights that we saw one night a few weeks ago. I decided that his birthday card should be justly themed =)
I stamped the UFO in stazon black onto white cardstock, then colored it with watercolor pencils. Using my blender pen, I finished off the coloring.
It needed some texture, but for me that usually comes in the form of ribbon and/or flowers. Let's just say this guy, is not a girly guy. I had to think of something else, the texture plate with my cuttlebug did the trick.
The eyelets are the final touch. Happy birthday!!
Thursday, March 1, 2012
textured smile card
Is my style changing?
This is the second card -IN A ROW- that isn't ink distressed.
Am I ok?
Is something wrong with me?
Love the texture this one has. Used embossing folder with the Cuttlebug to get it. Some expired SU patterned paper and ribbon go perfectly with it.
My new stamp set, "Four Frames" was used here. I can't wait to get the matching punch!
Labels:
card,
cuttlebug,
patterned paper,
ribbon,
stampin up
Wednesday, February 29, 2012
happy hello
Can you say "expired"?
I used this great neighborhood set that I got last year (I think) from Sale-A-Bration, FOR FREE!
I used ink that is no longer available (Soft Sky).
The gingham ribbon was from like 2006 or so, definatly NOT available!
Bottom line: No matter the date of the product, Stampin' Up! has amazing stuff! Like it never gets old! Well, it gets old, but not old enough to make it not cool enough to use.
NEW STAMPS!
This is one of my new sets from Stampin' Up!
Is it just me, or are birds, bird cages, and chandeliers all the rage right now? I personally, also love owls. There's some super cute stuff out there!
I stamped the bird first in Lavender Lace, then stamped the cage over it in basic black.
I attempted to dye the satin ribbon with ink, it didn't turn out the way I wanted it, so I just flipped it over! :)
See the stamp set HERE
Is it just me, or are birds, bird cages, and chandeliers all the rage right now? I personally, also love owls. There's some super cute stuff out there!
I stamped the bird first in Lavender Lace, then stamped the cage over it in basic black.
I attempted to dye the satin ribbon with ink, it didn't turn out the way I wanted it, so I just flipped it over! :)
See the stamp set HERE
Monday, February 27, 2012
bigger frames
This is the before. Plain white frames with some detail on them. Almost like wood-work. These are GREAT frames! I am so lucky to get to play around with this stuff!
This one is my favorite! I love the way it came out. I think the paper just makes it, you know? It just wouldn't be the same without that great paper. The ribbon being on the outside of the glass is cool, too.
I like this one, it turned out ok. To be honest, something's wrong with it. I think it might be the thin ribbon. I think it needs to be bigger or a different color, or something. I don't know, but it needs something.
These are two other large frames, I covered their mats with tissue paper (polka dots) and wrapping paper (map). I was thinking for a childs room and a travel photo. As long as they sell to make money for the residents, my job is done!
This one is my favorite! I love the way it came out. I think the paper just makes it, you know? It just wouldn't be the same without that great paper. The ribbon being on the outside of the glass is cool, too.
I like this one, it turned out ok. To be honest, something's wrong with it. I think it might be the thin ribbon. I think it needs to be bigger or a different color, or something. I don't know, but it needs something.
These are two other large frames, I covered their mats with tissue paper (polka dots) and wrapping paper (map). I was thinking for a childs room and a travel photo. As long as they sell to make money for the residents, my job is done!
before & after picture frames
Here is the before. Plain, white picture frames donated to the retirement home from Michael's arts & crafts store. They've been so generous in their giving! We're hoping to have a craft sale with all the projects that we've been working on here in the next month or so. I'll keep you updated on it!
And the finished products.
We covered the mats in the white frames with some great scrapbooking paper (also donated, thanks Michael's!!). For the black frames, we glued rhinestones to them (donated) in different patterns. The residents had fun, and they look great!
Thursday, February 16, 2012
Make & Take book
Made this the other day for the "Make it, Take it" event at my local Michael's store.
I typically don't like construction paper, especially since I've been spoiled with such great cardstock and specialty papers! But was amazed at what could be done with 4 white lunch sacks, white glue, construction paper, and decorative scissors.
AMAZING!!
Sweet Treats
Made over 60 of these beautiful
--double flavored--
cupcakes for my girls to take to school. They are a combination of Strawberry and Brownie batter cakes. Got a new cake tip to try out on the frosting. Used Strawberry & Vanilla frosting, topped with extra large chocolate conversation hearts.
They were a hit!!
Wednesday, February 15, 2012
Thursday, February 9, 2012
in store demo
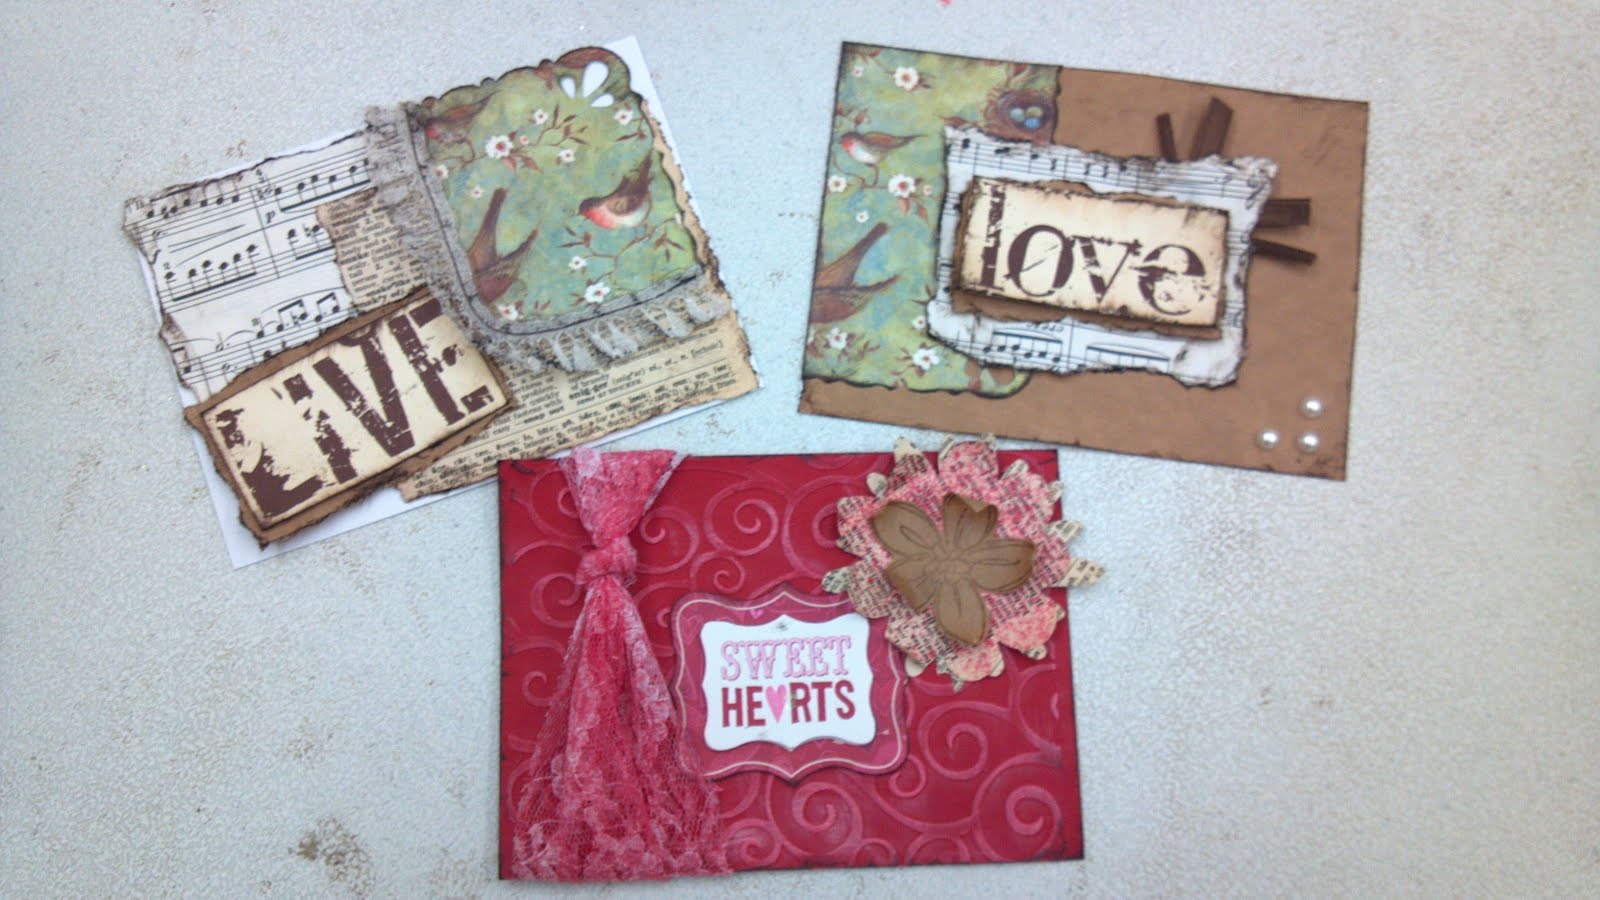
made these the other day doing an in-store demo. Fun, Fun!! i got to stand in the front of the store with my supplies interacting with customers, teaching them tricks on the fly.
demo'd lots of distressing techniques (imagine that, my FAV!!) and how to use ink to color lace using ink pads & smooch spritz.
Labels:
card,
cuttlebug,
dictionary paper,
distressed,
dry embossing,
ink distressing,
k and company,
lace,
love,
michaels,
paper flowers,
paper tearing,
patterned paper,
sheet music,
smooch spritz
Michael's promotion board
we're having an open house at my local Michael's on March 3rd, 1pm-3pm. you can come in and meet the instructors, get info on the classes they offer, and sign up for them at a discounted price! check your local store, this will be a nation-wide thing!
so here is my board promoting some of the classes that i teach. lot's of fun, come craft with me!
see what classes your local Michael's is offering
click HERE
Monday, February 6, 2012
mini paper bag album
i will be teaching a great class at my local Michael's store later this month on paper bag albums.
these are super easy
-my kids are making one
cheap to make
-hello?! paper bags?!
-use the sticky tape OR hot glue
perfect size for scraps
-goodbye pile!
for info on these super cute paper flowers, click here.
love the distressed look on any (and every) thing.
it's almost better with the great earth tones of a good 'ol lunch sack!
worlds cheapest adhesive? dollar store glue gun, with glue sticks found at thrifts stores or the dollar store. i know not everything works with hot glue, but if it does, *cheap* *cheap*
every page is lined with scraps from my pile
all ink distressed, of course :)
you don't have to have scrap paper inside,
you can doodle, draw, or just adhere pictures
tabs are circle cut outs glued back to back around the edge of the sacks. great little page turners that can be customized!
you can also combine the paper with the doodles
here i did a two-tone page with coordinating paper
and "attatched" them with faux stitches (doodling)
you can "stitch" borders for another amazing sewn look
the word "spot" was me using the cricut to cut out the word "spotted" for another project.
here i used the negative of the word to let the bag show through
just another way to use scraps
the bookmark tag is cut out paper, placed back to back, with the ribbon adhered to the inside of them
for the back i continued with the negative use of die cut words and flowers
i love this little book. can't wait to fill all the little nooks & crannies with memories and treasures!
you can see a great tutorial here
Labels:
$ saving tips,
die cut,
distressed,
feux stitching,
ink distressing,
michaels,
paper bag album,
paper flowers,
paper tearing,
patterned paper,
punches,
ribbon,
scallop,
scraps,
tim holtz,
tutorial
Wednesday, February 1, 2012
scrapbook page
this is a page that i made to promote a new class that i am offering at my local michael's store called "sketched out 2". don't worry, #1 is also still available if you missed it :)
lots of stuff going on here, but i'm loving the shabby-ness of it. yes, that is a word, just not sure if i spelled it correctly ;)
if you want to learn to scrapbook, there are lots of classes available now. and don't tell anyone i said anything, but i think in march, all classes will be half off!!!
Tuesday, January 31, 2012
cropping with mom
this is my mom. isn't she lovely? i agree =D
we had a crop at my local michael's store, and look at all the goodies she made! i consider myself so, so, so fortunate to be able to spend time with my mother. my other siblings all live at least 8 hours away (one across the country!!) and don't get a lot of time with my parents. how blessed i am that God shook his head at me asking to move away as an adult.
my mom did a lot of techniques on these cards:
fussy cut
paper distressing
paper tearing
ink distressing
rubber stamping
she used:
ribbon
punches
rhinestones
brads
buttons
and forced me to learn the cricut (boy do i feel dumb! it was simple!!)
she made a hanging piece of wall art for my grandmother (on the right) and a mini album out of paper lunch sacks (on the left).
thanks so much for crafting with me, mom! seriously, the only thing better than family is crafting with family
Monday, January 30, 2012
paper flower how-to
i will be teaching a new class at Michael's starting next month titled "flowers WOW!". these are the wonderful creations we will come up with! just because you're you, and i love you, i'm gonna share my how-to with these. super simple!!
for these flowers, i started with a 6x6 square of cardstock. i rounded the corners (doesn't have to be perfect) and then, using regular scissors, cut into paper like a circle, but creating a spiral shape, trying to leave about 2cm in between cuts. when you get to the center of the paper, leave about the size of a nickel un-cut. starting with the outside, roll the paper around a pencil until you get to the "nickel" piece. here you can keep the flower tight or let it loose if you'd like, i let mine go just a bit.
i used hot glue gun on the "nickel" piece and pressed my flower into in lightly.
here's where the variations come in. you can use decorative scissors to cut the spiral, changing the look of your "petals"; ink &/or stamp the paper before you roll it. you can also spray glitter or shimmer mist onto finished flower, or mist lightly with water and smash with your palm. lots of cool things to do with these!!
for these flowers, i started with a 6x6 square of cardstock. i rounded the corners (doesn't have to be perfect) and then, using regular scissors, cut into paper like a circle, but creating a spiral shape, trying to leave about 2cm in between cuts. when you get to the center of the paper, leave about the size of a nickel un-cut. starting with the outside, roll the paper around a pencil until you get to the "nickel" piece. here you can keep the flower tight or let it loose if you'd like, i let mine go just a bit.
i used hot glue gun on the "nickel" piece and pressed my flower into in lightly.
here's where the variations come in. you can use decorative scissors to cut the spiral, changing the look of your "petals"; ink &/or stamp the paper before you roll it. you can also spray glitter or shimmer mist onto finished flower, or mist lightly with water and smash with your palm. lots of cool things to do with these!!
Wednesday, January 25, 2012
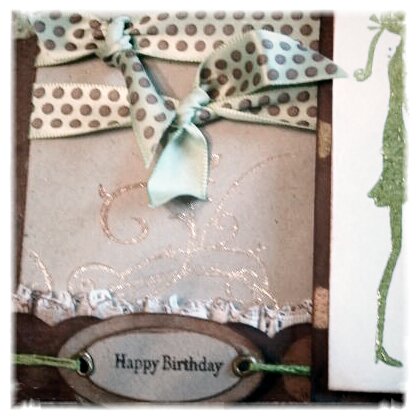
birthday card
i used a piece of brown paper bag on this, wanna play "i spy"?
this turned out super cute, it's definatly on my "like" list. honestly, it's amazing how many projects i finish and end up not liking the results. this here, not one of 'em! lots going on, but there's no such this as too much.
baby & i have both been sick for the last couple of days, it was nice to get my fingers dirty. i love how i can jump into my hobby whenever i want. having a craft area in the house is so convenient. i'm so fortunate to be able to have a hobby. before i came across paper crafting, i was the person my family had wrapping all the gifts at Christmastime. that was pretty much the extent of my craftiness. i love it when God makes me blossom!
card is 5x5
i stamped a flourish then went over it in a glitter pen.
girl is heat embossed in a clear gloss.
i inked the lace before bunching it up behind the patterned paper.
to cut the scallops, i took the guide off my slit punch and made it into a border punch.
dimesionals, layers, and inky edges, OH MY!!
this turned out super cute, it's definatly on my "like" list. honestly, it's amazing how many projects i finish and end up not liking the results. this here, not one of 'em! lots going on, but there's no such this as too much.
baby & i have both been sick for the last couple of days, it was nice to get my fingers dirty. i love how i can jump into my hobby whenever i want. having a craft area in the house is so convenient. i'm so fortunate to be able to have a hobby. before i came across paper crafting, i was the person my family had wrapping all the gifts at Christmastime. that was pretty much the extent of my craftiness. i love it when God makes me blossom!
card is 5x5
i stamped a flourish then went over it in a glitter pen.
girl is heat embossed in a clear gloss.
i inked the lace before bunching it up behind the patterned paper.
to cut the scallops, i took the guide off my slit punch and made it into a border punch.
dimesionals, layers, and inky edges, OH MY!!
Labels:
birthday card,
chalk ink,
eyelets,
flourish,
gel pen,
glimmer mist,
heat emboss,
ink distressing,
k and company,
lace,
patterned paper,
rhinestones,
ribbon,
rubber stamp,
scallop,
stampin up
new inspiration
talk about a TON of pretty in one spot! i was on split coast stampers just looking around and came across a company i hadn't heard of before.
whiff of joy
AMAZING!!
it's vintage, inky, shabby, cute, and some extreme texture! LOVE it!!
whiff of joy
AMAZING!!
it's vintage, inky, shabby, cute, and some extreme texture! LOVE it!!
Sunday, January 22, 2012
tiny dancer
so my little girl is no longer tiny, but she will always be my tiny dancer.
it's odd the way things work out. my oldest daughter is a mini-me, in almost every way. it's seriously so obnoxious! i feel so sorry for what i put my mother through... i'm mostly kidding here. it can be horrible, but i am reaping what i have sowed and God has an amazing plan for my little leader. i got off topic. what i meant to tell you about was her dancing. this girl has some serious moves! ever since she could walk, she could keep a beat. she loves to sing, anything drama related, and when there's music, she can't sit still!
my other daughter is a diffrent story. first off, she's the spitting image of MY little sister. kinda freaky, in fact, maybe i'll post pictures of them at some point just so i can become the told-you-so fairy. well she (like my sister) has no rythem. she tries, oh how she tries, alas the girl can't even clap to a song in time. but more than anything, she is a princess and has always said she wants to be a dancer. we got her into dance classes, she had a blast.... for the first couple of months. she hated it and came to despise going on a weekly basis. needless to say it didn't work out.
no matter the outcome, my little girl will always be my tiny dancer.
this card turned out beautiful, totally more my style. INKY!! i got a new cartridge for my slice and was just dying to try it out, this is the outcome. comment me if you have questions, enjoy your week!
just in case she happens to pop in and read this, my sister needs to know that i'm not in any way trying to offend, i love her so very much. God knew exactly what i would need in a friend when he decided to one-up it and give me you as a sister. love you!!
Labels:
antique,
card,
chalk ink,
cuttlebug,
dictionary paper,
distressed,
flourish,
glimmer mist,
ink distressing,
k and company,
lace,
nestabilities,
patterned paper,
sheet music,
slice,
tim holtz
Thursday, January 19, 2012
shabby valentine
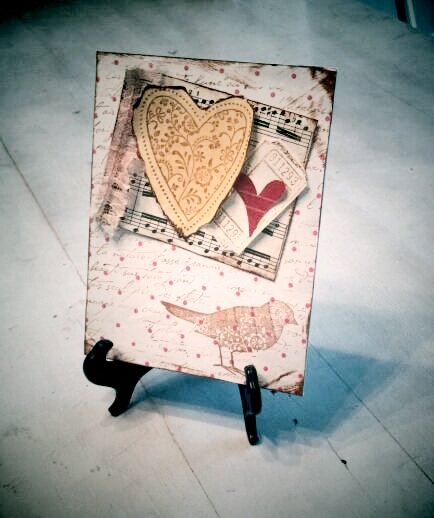
the valentine card i made last was cute, but so clean!! i just couldn't deal with it, so i had to make a shabby one! it's just not "jenn" if it's not ink distressed :)
many layers to this card, most of which i used tim holtz walnut stain on. the patterned bird and heart are from a SU (stampin' up!) set, so is the script that is stamped onto the patterened paper. the ticket stamp is a new one. well, not new, i've had it for about a year and half and never taken it out of it's package. it's from invoke arts and they have some great stuff! check them out here.
clean & simple
it's about that time of year again to think of love. when i think of lovey cards, i always go back to black, white & red. i just adore that color combination, so classy!
i made this for a Valentines party invitation for Sharon Care Center. and this has to be one of the most simple cards, only 2 pieces of paper, 2 stamps, 2 ribbons (well, one lace, one ribbon) and some stickles. clean & simple! ---which it usually not my style at all, so i'm amazed that it turned out cute AND i actually like it!!
Labels:
card,
lace,
michaels,
ribbon,
rubber stamp,
stickles,
valentines
Tuesday, January 17, 2012
my God, is an awesome God!!
this was the view i got the privelage of waking up to this morning. it's gorgeous! just simply breath-taking. i am in total awe of God's workmanship, he is seriously AMAZING!
i have been doing a study on the book of James and am swimming in 1:5&6. "..you should ask God, who gives generously to all without finding fault, and it will be given to you. but when you ask, you must believe and not doubt..." after looking outside, how can anyone doubt? my God, is an awesome God!
well, the power is back on so i'm gonna head to the craft room to bust out some valentines cards! enjoy your january!
Christmas wreathes
i made two wreathes this year. the red & white one was made for my mother in law. the blue and silver one was for us (hubby loves the look of those two colors at Christmas time!)
i got all supplies from the $ store and michaels AFTER Christmas last year when every holiday item was up to 80% off. i went back a couple of weeks ago to stock up on holiday items for next Christmas. can't beat clearance!
Saturday, January 14, 2012
cupcake for a teenager
my baby turns 13 tomorrow!
when she returns from winter camp, there's a family potluck at church. instead of bringing a dish to share, i'm taking almost 100 cupcakes!
Tuesday, January 10, 2012
altered journal
my daughter is turning 13 this weekend. 13!!
thirteen. *sigh*
i will be the mother of a teenager and a 7 month old, all at the same time. talk about mid-life crisis!
i made this altered journal for her to take with her to winter camp. the good kid she is *cough* (this time, for now, but no really, she's a good kid, sometimes), all she wanted for her birthday was to go to winter camp with our church youth group. i am seriously so proud of that decision! i don't even think there's a boy involved (other than Jesus, of course)!
took apart a spiral bound notebook and covered the front and back with scrapbook paper using mod podge and hot glue. used my crop-o-dile on the edges before putting it back together. if this were for me, it would have beed completely distressed, however, that's just not her. so she picked out her ribbons and flowers and away we went!
prayers for her to not only have an absolute blast, but return home with the beginning of an itimate relationship with her heavely father.
Subscribe to:
Posts (Atom)