Jennifer teitzel crafty https://bit.ly/3QU7Pqc Jennifer Teitzel

the soul & body with crafts, DIY projects, self sufficient adventures, and oily remedies
Thursday, January 19, 2023
Monday, November 28, 2022
Monday, August 29, 2022
How's it going jennifer teitzel crafty?
Jennifer teitzel crafty
https://www.google.com/search?q=jennifer.teitzel.crafty@blogger.com
Jennifer Teitzel
Wednesday, June 8, 2022
Yo jennifer teitzel crafty!
Jennifer teitzel crafty
https://www.google.com/search?q=jennifer.teitzel.crafty@blogger.com
Jennifer
Jennifer Teitzel
Wednesday, April 20, 2022
Friday, November 12, 2021
Monday, December 7, 2015

DIY beard oil
Yay for homemade Christmas gifts!
I used the recipe found HERE----> https://www.bloglovin.com/blogs/everything-etsy-1662324/diy-beard-oil-gifts-for-himfree-printable-4321261388
Hubby tried it out, loved the smell (so did i!) and said it felt great on. I wish more men in my family had beards!

Sunday, April 12, 2015
Friday, December 26, 2014
F4A253 Challenge
So I decided to have some ME craft time. Nothing to make for anyone in particular, just wanted to get inky and craft. I've been neglecting my stamps lately, so I headed on over to Splitcoaststampers (SCS) to see what the challenge was today. Today was a Free for all, "CASE of Admiration" (CASE= Copy And Share Everything).
Since I've been stamping, my absolute favorite stamper to follow was Faith Horfrechter, you can see the card that I CASED in her SCS gallery
 What a fun challenge, I loved getting inky for it :)
Since I've been stamping, my absolute favorite stamper to follow was Faith Horfrechter, you can see the card that I CASED in her SCS gallery

Quiet book
So we had a funeral to go to last summer and it was AWFUL! Not because of the normal reasons that funerals are so hard, but because my three year old is CRAZY and doesn't sit still for nothin! Since that horrible, no good day, I decided to make a quiet book for him. Then I put it off because I have other children and a sick husband and duties and such, so it became a Christmas gift (that I finished on Christmas Eve. Yup. Burnt the midnight oil on that one!)
So this is the front of it. Someday, I'll decorate the front to make it pretty. For now, I was just glad that he could open it mere hours after it was finished and wrapped! I got tips and tricks on quiet book covers from First time mom... and losing it
 This page was so tedious! I cut out the templates onto paper, then pinned to my felt, then cut out. And guess what?! The kids have been using my good scissors on who knows what- paper, orange peels, wire... my scissors now suck and it was very difficult to cut out all these super cute little pieces. I found the idea and the template for this page HERE
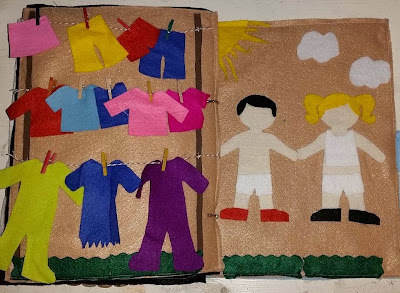 And the make-a-monster page. Don't think my spacing turned out how I wanted it, not sure my three year old will notice though ;)
Got the idea and info for the page at little miss stitchers
 The barn page is my favorite, got the idea from A Quiet Book Blog, which is just a wealth of ideas, tips, and tricks! I got my templates from another site though, keep looking!
 I am passing you the template that I used for my animals, I got it from Sunshine, Lollopops, and Rainbows. Her template for the barn is also there :)
 A couple of learning pages, one on counting and the other on number recognition, practicing using the phone (NO, that is not a real number!! But in his book, they are real so he can learn grandmas, grandpas, and our home info). I got the idea and template for the phone page from Thread Riding Hood. As you can see, I did mine a bit different, mainly due to only being able to use what supplies I had on hand. Not too shabby for making due with what I had, though :)
I got the idea for the beaded counting page from Sugar Bee Crafts
 So that's my sons quiet book. And next to a new little bike, it didn't stand a chance. Oh well. I have several other pages that I'd like to still make and add. Maybe I'll update this post if/when I complete them.
Maybe.
"If".
I have lots of great ideas on my "quiet book" pinterest page, feel free to take a peek and pin away!
Hope you all had a Merry Christmas!!
So this is the front of it. Someday, I'll decorate the front to make it pretty. For now, I was just glad that he could open it mere hours after it was finished and wrapped! I got tips and tricks on quiet book covers from First time mom... and losing it


Got the idea and info for the page at little miss stitchers


I got the idea for the beaded counting page from Sugar Bee Crafts

Maybe.
"If".
I have lots of great ideas on my "quiet book" pinterest page, feel free to take a peek and pin away!
Hope you all had a Merry Christmas!!
Thursday, December 18, 2014
Handmade soap
So this year for Christmas, we're all about homemade. We're trying to get back to what the reason for the season really is: Christ.
As a family, we made some gifts for our family and friends that we thought would be useful and fun, and we enjoyed making them :)
One of our gifts is homemade soap. I made a new friend that has an old trick- soap making! Once hearing our goal of a total DIY Christmas, she offered to teach me her ways
 I fear that I couldn't do it again if my life depended on it! My crazy kids couldn't leave me alone or not need to go potty or behave with each other long enough for me to do anything! I watched some of the process, stirred, and got to wear some pretty cool looking safety gear.
The outcome? Lovely Cocoa-Peppermint soap. Smells SOOOOOO good!!
I fear that I couldn't do it again if my life depended on it! My crazy kids couldn't leave me alone or not need to go potty or behave with each other long enough for me to do anything! I watched some of the process, stirred, and got to wear some pretty cool looking safety gear.
The outcome? Lovely Cocoa-Peppermint soap. Smells SOOOOOO good!!


Wednesday, December 10, 2014
Ugly sweater time!
It's that time of year again... time to go in public in the most hideous, gaudy, most disgustingly ugly sweater that you can possibly buy (or in this case, make). Ahhh, Christmas. With it's many perks, lovelies, decor, and traditions.
We made ugly sweaters a few years ago, however due to mold issues in our home (gotta love the Pacific Northwest!!) they were burnt earlier this year. Once the invitation arrived for our church's ugly sweater contest/Christmas party, I made a trip to the thrift store! Now I prefer the hole-in-the-wall shops over the Goodwill. Most of them have lower prices and support a local cause. Sometimes you can even barter with them! Since I consider myself the queen of frugality, cheaper is better!
Step 1-
Purchase sweater. I opted for a cardigan style, just a plain green thing.
 Step 2- Gather your decorations. I bought two bags of misc. Christmas stuff at the thrift store. My bags had everything from tinsel to stockings, stockings to candle holders, bows to bulbs. A "plethora" of decorations, if you will (wanna play name that movie? "If you do not know what a plethora means, then why do you say I have a plethora of gifts?")
 Step 3- Start hot glueing anything (and everything) on. Last time we decorated sweaters, I sewed most of it on. I busted both sweaters out in two evenings. Love the convenience of a glue gun!
Note: With using hot glue on a sweater, might want to place something in between the layers of material (I used a cut up cereal box) to prevent glueing the front to the back
Step 3- Start hot glueing anything (and everything) on. Last time we decorated sweaters, I sewed most of it on. I busted both sweaters out in two evenings. Love the convenience of a glue gun!
Note: With using hot glue on a sweater, might want to place something in between the layers of material (I used a cut up cereal box) to prevent glueing the front to the back
 Step 4- Glue more on. There's always room for more.
 Step 5- Add more decorations. Elbow pads, shoulder pads, trim, collar.... what else could we add?
 The finished product, front ^ and back v.
 The start of hubby's sweater (just the sweater is seriously so ugly. It reminds me of Fozzy bear)
 Made a tree out of the leaves from the poinsettias on my sweater. Wreath on one shoulder, dove on the other. Hubby needs a birdy on his shoulder, like a Christmas pirate!
 Decorate the tree!
 Hubby's finished sweater from the back
 Hubby's finished sweater from the front. Yes, that's tinsel chest and armpit hair. I know. Super gross (but totally hilarious!!)
 Our finished products. Yes, I'm wearing a tree skirt. It seemed fitting. Yes,we won the ugly sweater contest. Yes, one of my daughters also made one. Yes, my little boys are both in Christmas sweaters (not quite ugly though), and one of them has a thing for Power Rangers currently). And yes, my oldest daughter is too cool to play along.
 Thanks for visiting! If you make ugly Christmas sweaters, I'd love for you to share them with me!


Monday, December 8, 2014
Lip & body balm
Yay for homemade products!
I got the idea/recipe from: http://teacupsandpearls.wordpress.com/2013/11/15/frankincense-and-cinnamon-winter-balm/
In her recipe she didn't specify amounts... I used 1/4 cup of cocoa butter, 1/4 cup beeswax, 1/2 cup of coconut oil, and 7 drops of EO.
Excited to hear the reviews on them!

Monday, October 13, 2014
Baby quilt (only a year late)
So I had the top of this quilt done the day before I went into labor (last Labor Day, ha ha ha), then I had a baby, life got crazy, and it sat in a drawer. FOR A YEAR!!
Grandparents took the littles for the day so i looked for a way to be productive. BAM! Quilt time :)
This little triangles were time consuming puppies, I tell ya! I really wanted them on there though, my grandma put them on mine & I remember sucking and chewing on them till I was like 10 or something. Yeah, probably younger than that, but you get the picture.
Love, love, love that fluffy backing I found for it, so cozy! My daughter felt it and reminded me that I still owe a quilt.... and she'd like the back to be just. like. that.
Guess you know what I'll be working on for Christmas, eh?
Any who, love the way this quilt top was put together. TRIANGLES! Lots of triangles put together to make a chevron pattern. Genius.

EO on baby with a fever
So my 13 month old must be getting another tooth (about time, he only has 6 1/2!), he started with a low fever yesterday afternoon. He quickly decided his tummy hurt, followed by diarrhea. I put peppermint oil (1 drop, mixed with coconut oil) onto his tummy. Within 10 minutes he stopped crying and acting like it hurt. No more diarrhea either!
After bath time (which includes a few drops of lavender in the water) I rubbed lavender & thieves on the bottom of his feet, then reapplied the peppermint to his tummy and rubbed down his spine.
That boy slept for N I N E straight hours!! And woke up with NO fever!!
I'm lovin' these oils!

Saturday, October 11, 2014
Young Living starter kit
Got my starter kit, got all started!
I've been busy whipping up batches of all sorts of cool stuff! Can't wait to try them out & let you know how they turned out!

Thursday, October 9, 2014
Young Living Essential Oils
I'm so excited to begin this journey, and so glad that I get to share it with you! I was introduced to the healing powers of essential oils a few years ago, but didn't have a desire to use them until quite a bit later. I decided about a year ago that I wanted to get involved with Young Living essential oils, however, circumstance after circumstance occurred, keeping me from taking the plunge. With my husband's health deteriorating rapidly (much more on that topic in future posts), having two hormonal teenage girls, my three year old being a crazy monster (seriously, he's the poster child for ADHD), and my 13 month old never needing sleep-- I. NEEDED. HELP. My baby sister was to the rescue! She's an "Oily Sista" and knew that my family could greatly benefit from the use of oils. A couple days later, here we are! I got my starter kit yesterday and have been all OVER pinterest getting recipes to try! I can't wait to have some awesome stories to tell you about how these oils have changed my life, Thanks again for joining me! Let the adventure begin!
jenn*
jenn*
Monday, October 6, 2014
Painted pumpkins
We decided to take a different route with our pumpkins this year. PAINT!! 

Ever since I saw painted gourds on Pinterest (link here)
I was obsessed.
SOOOOO......
Here's my chicken!

The kids made quite a mess, I was smart enough to set up outside, with all surfaces covered with butcher paper.

Sunday, February 2, 2014
Altered book

Wednesday, July 17, 2013


Friday, June 21, 2013
Adventures in cinnamon rolls
My husband just loves anything with dough and anything sweet. His mom makes some serious cinnamon rolls, so I have set out to top them. Too bad he wasn't home to do the taste test, guess the 4 kids that are here will have to do!
In my looking for the perfect recipe (pinterest) I came across one that was almost perfect. I used her recipe as a base and altered it slightly. You can see Lydia's recipe HERE
Cinnamon Pinwheel Buns
Recipe adapted from Pioneer Woman Cooks
Makes 2 batches
Ingredients for rolls:
2 cupsMilk
1/2 C Vegetable Oil
1/2 C Sugar
2 1/4 t Active Dry Yeast
4 1/2 C Flour
1/2 t Baking Powder
1/2 t Baking Soda
1/2 T Salt
1 Cup Butter, melted
3 T Cinnamon
1 1/2 C Sugar
Maple Icing:
3 3/4 Cup Powdered Sugar
3 T Butter, melted
1/4 C Milk
2 T Maple Syrup
I'd say today's been a good day.
In my looking for the perfect recipe (pinterest) I came across one that was almost perfect. I used her recipe as a base and altered it slightly. You can see Lydia's recipe HERE
Cinnamon Pinwheel Buns
Recipe adapted from Pioneer Woman Cooks
Makes 2 batches
Ingredients for rolls:
2 cupsMilk
1/2 C Vegetable Oil
1/2 C Sugar
2 1/4 t Active Dry Yeast
4 1/2 C Flour
1/2 t Baking Powder
1/2 t Baking Soda
1/2 T Salt
1 Cup Butter, melted
3 T Cinnamon
1 1/2 C Sugar
Maple Icing:
3 3/4 Cup Powdered Sugar
3 T Butter, melted
1/4 C Milk
2 T Maple Syrup
 |
| ♥ Gently heat the milk, oil and sugar over a medium heat then set aside to cool. ♥ When milk mixture is lukewarm sprinkle the yeast on top and let it sit for a minute. ♥ Add 4 cups of flour to the mixture and stir with a wooden spoon until it is just combined. ♥ Cover with a tea towel and leave it to rise in a warm place (like in the window or hot water cupboard) for an hour. ♥ Once dough has risen, add baking powder, baking soda, salt and the rest of the flour and stir thoroughly to combine. ♥ Sprinkle some flour on a bench and roll out half the mixture into a large rectangle. ♥ Brush on a generous amount of butter over the dough. ♥ Sprinkle half the cinnamon over the entire dough surface followed by half of the sugar. |
 |
| ♥ Roll up the dough nice and tight and secure by pinching the edges together. ♥ Transfer your cinnamony dough log to a chopping board and cut into even pieces about 3cm wide. ♥ Repeat the process with the other lot of dough. ♥ Grease two cake tins with Pam and place sliced rolls inside, making sure not to over crowd them. ♥ Cover the tin with a tea towel again and let them sit for at least 20 minutes to rise again. ♥ Preheat oven to 375 and bake for 13 to 17 minutes until they are golden brown. ♥ While the buns are baking make the maple icing. |
 |
| My two year old sat in front of the oven for at least 3 minutes just starting at them. If you know toddlers, 3 minutes is like a lifetime! |
 |
| Pour the icing over the rolls while still warm |
 | |
| They were seriously DELICIOUS! And I just snagged a cold one, and it's still soft and gooey, almost just as good cold. Almost, not quite, but almost. |
I'd say today's been a good day.
Sunday, June 16, 2013
Father's Day cards
Crackle background stamp, spritzed marker, made flag wrapped in twine, stamped sentiment, used Big Shot to cut it out, cut out sentiment in darker ink.

Love, love, love the SU wood embossing folder! Made flag wrapped in twine, stamped sentiment, used Big Shot to cut it out, cut out sentiment in darker ink.
Happy Father's Day to all the dads out there!
Used the Big Shot to emboss the lines, created a boy out of ribbon, stamped sentiment and cut out.

Used color spritzer tool and a marker on background, cut out multiple flags out of cardstock, stamped image, cut out, used crop-o-dile for eyelets and twine.

Used patterned paper to make corners and as background, sanded paper. Stamped sentiment on paper then used punch on bottom, added wrapped wire to side for a 'masculine' touch.


Subscribe to:
Posts (Atom)