Thursday, March 31, 2011

Girl bday invite


Made this for my daughters birthday invitations. The only thing she cared about was pink glitter, and that image (girl walking the poodle).

The image is from the stampin up set "she's all that". I stamped her in versamark ink and heat embossed her with a mixture of black embossing powder and pink glitter. I used 3 little dots of pink stickles on the edge of her paper. The sentiment, "let's party", is part of a michaels dollar bin acrylic set. I stamped it in pink and wrote over it with my sakura glitter pen. The edges of the black paper underneath are scalloped with my martha stewart rolling handheld scallopper.

Patterned paper is k & co. Best place to get this is michaels with your 40% off coupon, just fyi. Ribbon is also from michaels.

well she liked it, I think its adorable, let's hope they make it to the parents!


Sent from Yahoo! Mail on Android

2nd quilt


Well here's quilt #2. I picked up this fabric at the same time a the first, it just didn't fit in with the first and there was so much if it, I made a whole other quilt. The inside is a cut to fit fleece blanket and the backing is a brown sheet, both from goodwill.
This one us much smaller than the first, it'll be a great one for him to lay on the floor with or use in his play pen.

Sent from Yahoo! Mail on Android

Wednesday, March 30, 2011

First quilt


Yeah! I borrowed a friends sewing machine and got a lesson on how to use it. I scoured the clearance bin at walmart for fabric pieces. I went to the goodwill for the back piece (a yellow striped sheet) and for the inside (a fleece blanket cut to size). Over all, I think I paid less than $12 for everything.

My sister-in-law just moved here from Alaska and when she saw I was learning to sew, gave me her sewing machine. She had only used it once!

So I've made him another quilt (will post pics soon), and got some fabric and payed to try to make the girls sundresses. We'll side how those go.... I'm a bit scared.

Sent from Yahoo! Mail on Android

Monday, March 28, 2011

Little Mr.'s bedroom


Only 10 more weeks till he's due! Hubby and I are going with a green & brown color scheme (could you tell?), and this is one side of his nursery. Hubby drew the tree on with pencil and we all helped paint it. It was nice to have the girls help with his room too.
I've tried my hand at sewing lately, I've made my little guy two quilts! I'll try to post pics if them next.

Sent from Yahoo! Mail on Android

Thursday, March 24, 2011

One page, three photos


Every year we try to go to our local fair. It never fails that the girls favorite thing to do is go on the "big slide", this year dad went with them!
I my family scrapbook, I've challenged myself to use regular lined notebook paper on every layout. Since this page is about having fun, I decided to kinda doodle with my journaling and make it a but more fun too.

Sent from Yahoo! Mail on Android

Wednesday, March 23, 2011

Happiness 2 page layout


This is a layout I picked up at a quick quotes class last fall. They have awesome page kits, great chalk ink, and just amazing canvas sets (check out their website, I didn't know what you could do with canvas until I saw it!).

I think the best thing about these pages are the ginormous flowers. Now if you're anything like me, you've never bought these before because you're too cheap. Well, I have some money saving tips for you when it comes to flowers.

-typically, those awesome ginormous flowers are a little cheaper in white rather than in color. Buy them in white & color them yourself! Use a sponge with ink, you can make it your own perfectly matched embellishment!

-those large flowers look great cut in half, like on my page. Double your usage of them!

-if you have a cuttle bug, cricut, or slice, invest in flower dies or cartridges. Its always cheaper to make your own embellishments plus you get to pick the material they're made out of. Great way to use up scraps and match your pages/projects perfectly.

-make your own paper flowers using scallop punches or scissors

-if your mind is set on using silk flowers, there's three places I recommend you pick them up. The dollar store has bundles of flowers for, drum roll please, a dollar! michaels has the best flowers, get them on sale or make sure to use a coupon. The thrift store usually has bags of miscellaneous silk flowers for cheap, you just can't confirm what you're buying. Buying flowers on the stem is cheaper, you just have to take them apart yourself, plus they already have a hole in the middle for your brads!

Well there's my 2 cents on how to save some cents on flowers!

Sent from Yahoo! Mail on Android

Monday, March 14, 2011

Fussy cut flowers

Finished card is a top fold 4x4. I'm just not sure of it. Took me forever to pick out that ribbon, and I'm still not happy. Maybe its missing something... Opinions welcome!
Small flowers are not punched, they were stamped in chalk ink and fussy cut (it made me "fussy" to take so much time to intricately cut them out. Great name for the technique, right!).
"fussy cut" can be very cool. A lot of us have some pretty phenomenal patterned paper that we don't want to cover up. Well you don't have to, fussy cut the parts of it you like and use as focal point on your next project!


Sent from Yahoo! Mail on Android

Saturday, March 12, 2011

Elegant embossing


Was going for a clean, simple card. Imagine that, I didn't really achieve it.
I think the ivory embossing looks great with the neutral colors I chose, the lace goes perfect with the ivory, and that stamp is definitely the focal point.
So not my original "vision", but sophisticated and kinda classy. Maybe I'll put this away until someone gets engaged or married....?

Sent from Yahoo! Mail on Android

Friday, March 11, 2011

New paper flower technique


I did this card for the sole purpose of making these new flowers. I started by punching 1.5" circles out if dictionary paper (don't have a punch? Wing it by hand! Trust me, you won't be able to tell the difference!). Ok, now you cut into the circle to create a thin spiral shape to the core of the circle, I cut maybe 5 spirals into my circle. Starting with the edge you cut into, start rolling paper into itself until you get to the middle. The tighter you roll, the smaller your flower will be. I used a scrap piece of paper covered in adhesive to lay down my "bud" on, to keep it nice 'n rolled up.
Remember, there's no mistakes, especially with flowers. They're all supposed to be unique anyways.
Have fun playing around! Try different textured paper, like tissue!

Sent from Yahoo! Mail on Android

Thursday, March 10, 2011

Lots of dimension


I got this cute owl stamp from the $1 bin at michaels and was just messing around to use it.

I stamped him on patterned paper twice, fussy cut his eye balls & tummy from one and paper pieced them to the other stamped image. Used patterned paper and scallop nestabilities with my cuttlebug, also dry embossed them. Crimped the bottom chunk of patterned paper.

LOTS of dimension going on with this one!

Sent from Yahoo! Mail on Android

Wednesday, March 2, 2011

Did you know?

So I was in michaels yesterday (had to get some adhesive), and the lady asked if I got their online coupons. I told her I Did but couldn't use them as I don't have a computer, i just use my phone. I told her it would be nice if they came out with mobile coupons, and guess what?!

Did you know that if you have a coupon for michaels and you can show the person at the register, paper or on your phone, they'll give you the discount!

I've never been so excited to go back to michaels!

Tuesday, March 1, 2011

Layered & inked


This reminds newer is strawberry shortcake piled high. Absolutely mouth wateringly delicious!

Look at all those flourishes (TAC)! What great layers! My birdie (SU) is adorable! And ribbon on top of lace?!

I love this card.


Sent from Yahoo! Mail on Android

Monday, February 28, 2011

Cherish card


Very simple card, only used pain white card stock. This was a great stamp set by SU (stampin up), think its retired now tho. I stamped flowers randomly over card base then again on another piece of white. I watercolored ----- TIP: stampin up ink pads are the best for this kind of water coloring. You squeeze the pad while its still shut which gets some ink on the inside of the lid. When you open it, its like a little pallet waiting for you! ---- ok, tangent over. I water colored the flowers and fussy cut them when they had dried.
I used SU punches for the window.

there's seriously so many cool ways to water color. Don't hesitate to comment or email if you'd like more info.


Sent from Yahoo! Mail on Android

Sunday, February 27, 2011

Sympathy card


This card is an almost 100% stampin up card. Besides the glorious vintage button and the simple chocolate ribbon, it's all SU.

Sent from Yahoo! Mail on Android

Saturday, February 26, 2011

Thank you card


Ok, seriously, LOVE it!!!
Have you ever finished a card and wanted to run to the neighbors to show someone? Anyone?! Yup, love it.
I'm thinking of entering a contest in"paper crafters"magazine and use this as my 'thank you' card. Not sure if it will send well tho as my little curlies may arrive flat :(

Finished card is 5x5. If you have questions on products or techniques used, feel free to email me.

Sent from Yahoo! Mail on Android

Friday, February 25, 2011

Just because card


So my husband said this is one of his favorites that I've done, which is odd because when I finished it, I was disappointed.


Sent from Yahoo! Mail on Android

Thursday, February 24, 2011

Sketch card


Have you been over to splitcoaststampers.com? Best galleries, best challenges, TONS if info and techniques.
Every wednesday is card sketch day, and I did this card for sketch #321.


Sent from Yahoo! Mail on Android

Monday, February 14, 2011

My Valentine


Yeah for my cuttlebug! And ink distressing, can't forget that!

This was for my incredible husband. He wasn't that shocked when I gave it to him then asked for it back :)


Sent from Yahoo! Mail on Android

Wednesday, February 9, 2011

Thank you card


It's cards like this that make my last card easier to deal with.
It's cards like this that make me smile.
It's cards like this that remind me why I love card making!

It's vintage. It's shabby chic. It's amazing! I love it, can u tell?
I'm not sure what the best part is, that delicious paper, the soft lace, or the mouthwatering Glimmer misted dictionary paper flower. I'm just not sure.

Sent from Yahoo! Mail on Android

Slider birthday card


I HATE THIS CARD. Sometimes the wonderful and exciting ideas in your head just don't come to fruition. That time is now.

CHALLENGE: make a slider card & somehow use cuttlebug.

Challenge complete, but it's not pretty.


Sent from Yahoo! Mail on Android

She's expecting card


Made this on the fly. My sis-in-law is planning my baby shower and we were messing around with invite ideas.
My little guys colors are gonna be green & brown, so this was fitting.
We ended up going with a completely different card style, lots of fun and many pieces. When we complete them all & send them out, I'll make sure to post it.

Sent from Yahoo! Mail on Android

Thank you birdie card


CHALLENGE: use regular lined notebook paper on a card.

Challenge complete.

Super simple, cleaner than usual, thank you birdie card.
Used markers to color the stamp to get the brown branch & green leaves. Heat embossed sentiment in black to make it stand out a bit.

Sent from Yahoo! Mail on Android

Wednesday, February 2, 2011

New baby card


CHALLENGE: use a paper bag on a card

challenge complete.

My cousin will be delivering her baby either late february or early march, and this will be for the new little lady in her life.

Double page scrap layout


I have challenged myself to include regular lined notebook paper in all of my family scrap pages. And see the title? i used my cricut for the first time to make that!

Sunday, January 30, 2011

Boy birthday card

Boy birthday card


I think the most challenging thing for me to create is anything masculine. I made this for my nephews 12th birthday.
It turned out ok, better than I thought it would. Anything's possible with good paper.

Thank you for using Picture and Video Messaging by U.S. Cellular. See www.uscellular.com for info.

Thursday, January 6, 2011

girl party invitation tag


Made this for my daughters 12th birthday party, a "glam" party theme.
Paper is k & company and vintage sheet music. Used my Slice for the wings, the girl (both cartridge) and the cut out of "party" ( cartridge).
Glitter pens and ink distressing round it all out.

Here's hoping her birthday is loverly!

Sent from Yahoo! Mail on Android

Saturday, August 28, 2010

Yummy birthday card


Isn't this paper yummy? Love the colors together!

Made the sentiment plaque with my Slice machine. Really wanted to have some stitching on this, since i don't have a sewing machine, I used my sakura gel pen.

Wednesday, August 25, 2010

girly fufu

So this is just me messing around. I've had this great chandelier acrylic set for over a year and this is the first time ive used it.
The paper I've had for YEARS. It's from the angel company. I have lots of papers from hem that are just gorgeous, I'm scared to use them!
I decided since I hadn't used he stamps or the paper, I had to embellished with something rarely used also. I picked the crimper.
Pretty colors, pretty stamp, I'd say it turned out ok!

Tuesday, August 24, 2010

vintage & elegant wedding card

Card base is basic black CS. Covered with an ink distressed piece of Cream CS that has script stamped in walnut ink, torn at the top. Girl is from SU set, stamped in versamark and heat embossed with pharoahs gold on a piece of old sheet music. Used lovely piece of sparkle gold ribbon to catch the eye.

Monday, August 23, 2010

recycled bird

Card base is covered with packing paper, everything else is from the scrap pile.

I cut the bird out of a magzine, mounted on a srap paper, then adhered with 3D tape to base. Used twine scraps on side. Every paper is inked on sided with tim holtz walnut stain distress ink.

Friday, August 20, 2010

vintage birthday


Sent from Yahoo! Mail on Android


This is a 5x5 card made out of white CS. Covered front withthe acknowledgement page of a vntage book on ladies fashion. Ink distressed edges with tim holtz walnut stain distress ink. Stamped flourishes are SU "baroque motifs" stamped in same ink. Glued vintage lace across card front. Flower is made out of vintage sheet music using cuttlebug & sizzix "flower layers #3" die and sprayed with starfish glimmer mist. Used vintage gold button in center.

Sentiment is SU "warments regards" stamped in walnut stain & embossed with pharoahs gold on scrap from book page. Ink distressed edges & mounted on scrap of red. Leaf is cut from a martha stewart magazineB embellished with brown feather.

Monday, August 16, 2010

21st birthday

Sent from my U.S. Cellular® Android phone

My fabulous friend just turned 21!!

This card is 5x5 made on white CS. All patterned paper is from Stampin' Up's Simply Scrappin' "friends & flowers". Brown ribbon is from Michaels. Used this great acrylic stamp set called "cheers", think its retired from Close To My Heart. I stamped the glass in colorboxes opaque silver on white CS and cut out. Stamped liquid in SU's wild wasabi on whitw CS and adhered to glass. Lined top of rim of glass with liquid glue then dipped it in SU's green chunky glitter. When glass was fully assembled I put it on top of a thin piece of plastic (like the cellophane bag my last set of envelopes came in) and used exacto knife to cut out plastic replica. This replica was placed on top of the glass to make it look like glass. Used scrap of confetti white paper to mount glass to card.

Cherry was stamped onto red vellum and carefully cut out. Limes were stamped in SU's certainly celery.

Wednesday, August 4, 2010

wedding congrats

Sent from my U.S. Cellular® Android phone

This card was made for my new brother-in-law and his new wife. They got married last weekend on a gorgeous day.

Bird stamps are from the angel company. Used my SU blender pens & pastels to color them in. "Forever" was at the top of the page in the dictionary, worked out great for what I needed. Flower is the rest of the dictionary page, used my cuttlebug and flower Sizzix die for the shape. I used "starfish" glitter mist on flowers. Ink distressed the papers using tim holtz walnut stain distress ink direct to paper.

charming outdoor furniture

Isn't this just the most charming piece? My husband and I were walking downtown centralia when we passed an antique store with this outside. I took a picture and told him "I want one!!". He's a pretty busy guy and its not exactly the top of the priority list.... we'll see.

Thank you for using Picture and Video Messaging by U.S. Cellular. See www.uscellular.com for info.

Sorry my picture is askew. I can post from my droid phone, just can't post upright :D

Tuesday, July 27, 2010

Trying to post from my phone. Let's see if this works...

Tuesday, July 13, 2010

my craft room


this was my christmas present from my husband and my father in law!

after months of hearing me "ohhh" and "ahh" over pictures of craft rooms in magazines, i came home one night from work to a freshly painted room (GREAT colors, huh!?). christmas morning he had moved all of the homemade boxes and that awesome desk into the den. isn't he just the best?!

the boxes have so many uses! he made me paper sorters, drawers, shelves, and open spaces for my big stuff. he built the boxes to fit into the space and leave the window unobstructed for light.

my mr & his poppa: THANK YOU!!

crazy about picture frames


centralia college (local communiyt college here) had a spring craft show in which i had a booth. my first craft fair to be at as a vendor!! i brought about 55 frames and who knows how many cards... but this is about the frames!

i picked up these little guys at michaels for $1 each, unfinished wood frames that came in oval, square, rectangle, and heart.
i covered them in sheet music, patterned paper, cardstock, old wall paper, handmade paper, painted them... they were stamped on, ink distressed, sandpaper distressed, and modge podged.
i embellished them with hat pins, buttons, sequins, and flowers (homemade, fabric, die cut, silk).

more wedding accessories


these lovely things i made as table decor for our wedding. wanted something tall to offset the little glassware.
i bought two diffrent bases, both inexpensive terra cotta from home depot. used pots and saucers, covered holes in bottom with scotch tape before filling with quick dry cement (simple to use, never used before but was very easy to work with). i got diffrent kinds of twigs and branches from michaels and the backyard (another good reason to live in the middle of nowhere!) and shoved them into the cement as it was drying. once dry, i spray painted base of twigs, top of cement, and base itself with primer then with a chocolate/woodsy spray paint.
the birds i made out of ivory cardstock. each bird is two pieces (body & wings). before connecting peices, i ran the paper through my cuttlebug and enbossed with french script to give texture. once embossed, used scrapbook tape adhesive to connect wings to body, poked hole in through where the two were connected, and used fishing wire to sting up on the twigs.
once the cement was dry, i used hot glue on top of cement around base of twigs and stuck moss to base for the "natural" feel.

of all the things i made for our wedding, i think these were my favorite!

Monday, July 12, 2010

more wedding accessories


we shopped around for months before the wedding collecting odd vases, bottles, tea cups and saucers, candlesticks, and anything else that caught our eyes. we wanted blue, brown, and creamy things. items to hold vintage buttons, floating flowers, short and tall candles, sticks, feathers, flowers, beads...

we found some great wooden candlesticks that i spray painted chocolate and we used with tall teal tapers. we found some awesome old clorox bottles (brown glass) that looked impressive with a single blue hydrengea in them. got some short old copper candlesticks i spray painted cream then sanded for a vintage/distressed look. we turned them upside down and placed the tea cup saucers on top to use as a holder for the buttons and things.

i was very happy with what we collected and am still not sure which i enjoyed more, the collecting or using!

wedding accessories


i bought this creamy pillow at michaels and wrapped it with sheer wired chocolate ribbon coupled with a thin chocolate. the teal around the middle is actually left over material from my dress. turned out just gorgeous, matching our colors pefectly!

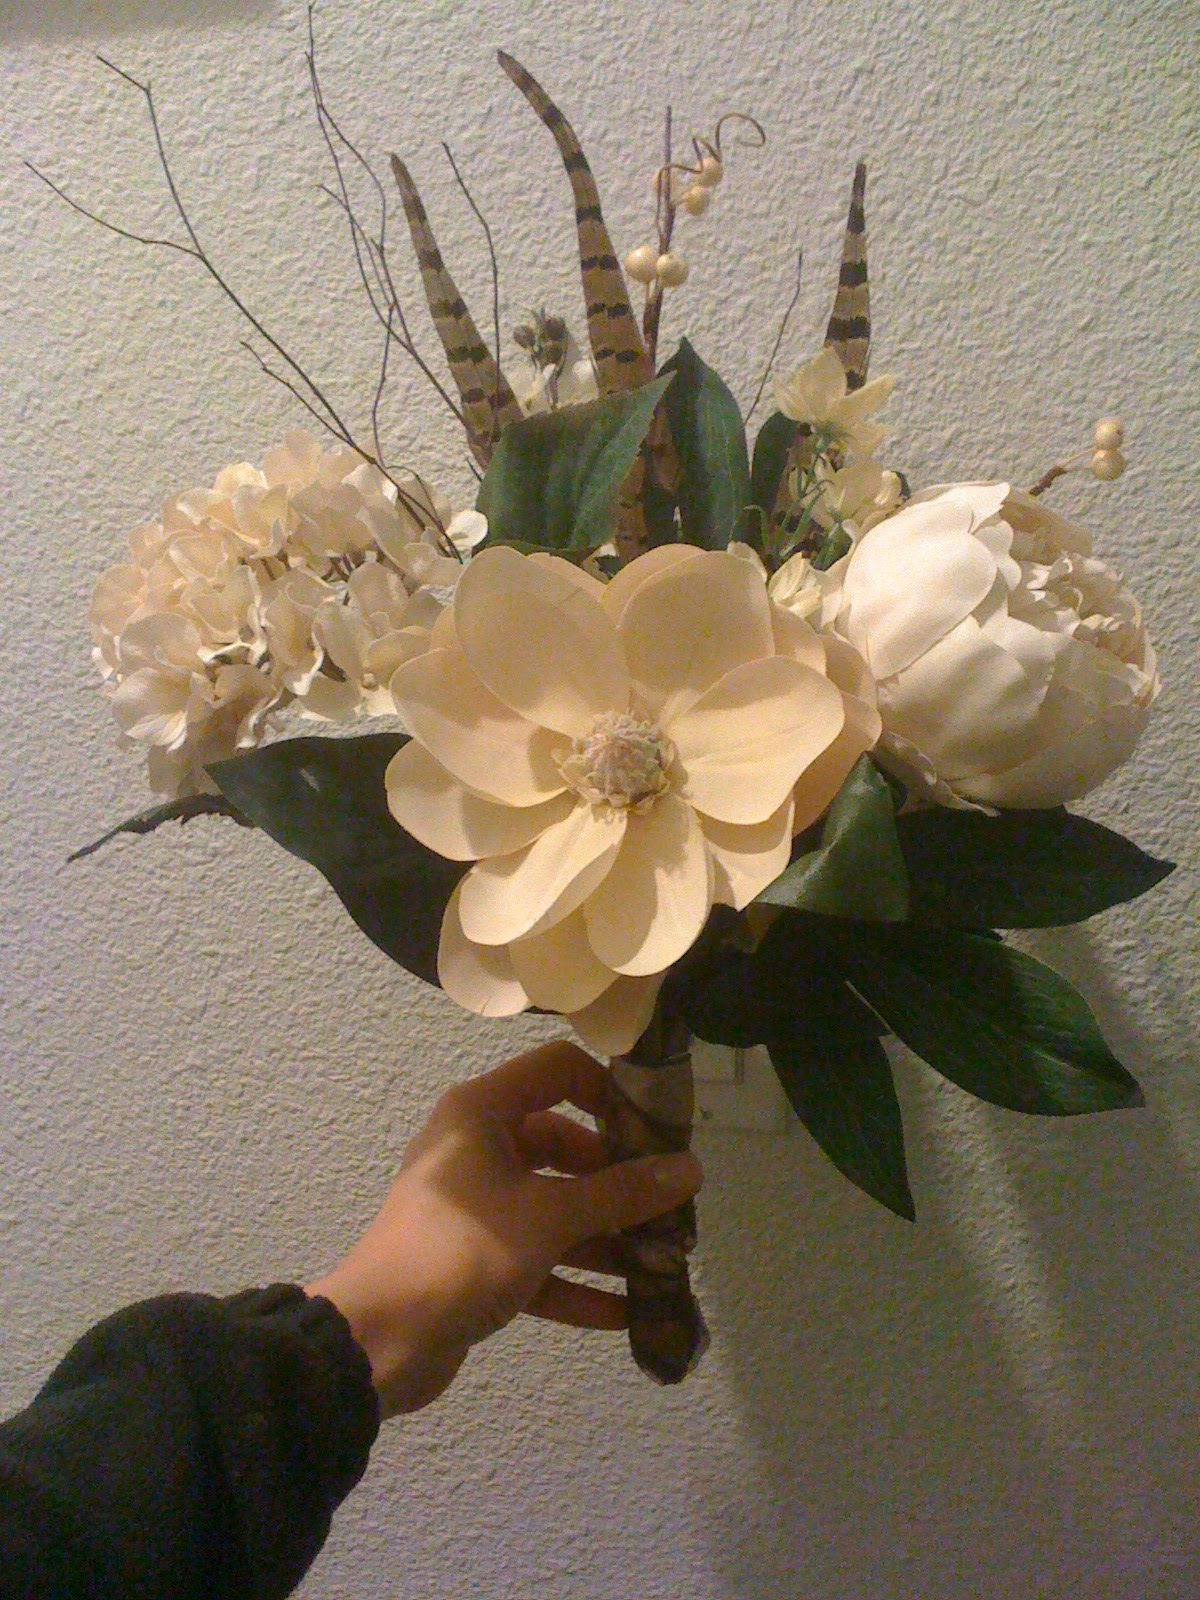
i made all the bouquets, mine and the two bridesmaids (my daughters walked with me). got all flowers from michaels craft store and paired magnolias, hydrangea's, roses (large open), and peonies with feathers and twigs. covered the stems with a creamy satin ribbon and covered that with the same sheet chocolate as in the pillow.

wedding day bling


this wonderful set was a wedding gift made for me by my friend and photographer, robyn bell (bluestreak.com). isn't it just absolutely FABULOUS?!? it was perfect for my perfect day. quirky, funky, vintage... thanks robyn!!

Friday, July 2, 2010

COMING SOON!

this blog is currently under construction. until finished, please feel free to visit my current blog